Transferring the content, users, and other data from your Drupal site to a WordPress site requires a number of stages during the migration from Drupal to WordPress. A general guide to assist you in the migrating process is provided below:
Set up a new WordPress site.
Install and configure WordPress on the new server to which you intend to move your site. You may install WordPress using the regular method.
Select the ideal WordPress permalink structure.
Drupal empowers you to craft appealing website URLs like: yourwebsite.com/blog/name-of-the-post.
But in default, WordPress, URLs might look like yourwebsite.com/?=123 – not so reader-friendly.
After migrating to WordPress, your carefully structured URLs might revert to the basic format. Avoid this by setting your permalink structure early. This step helps maintain link integrity.

To start, navigate to Settings > Permalinks. Opt for the Post name structure, our favorite. It grants you control over custom URLs for each post and page, preserving clarity. While custom structures are possible, Post name generally suffices. Make the switch and ensure your web address stays polished and organized.
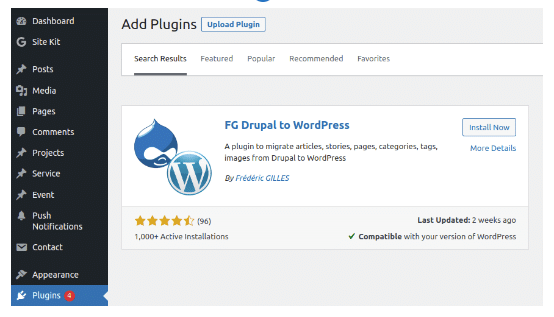
Install FG Drupal to WordPress plugin.
To make the migration process easier, you may utilize the “FG Drupal to WordPress” migration plugin. These plugins can assist in automating data transmission.
Select WordPress content settings.
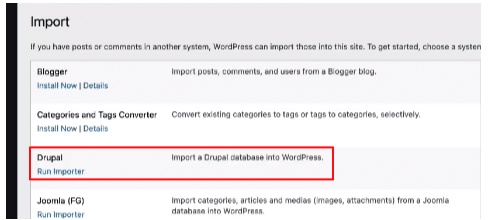
In WordPress, navigate to Tools > Import to begin the migration process. Then, under Drupal: Import, select Run Importer.
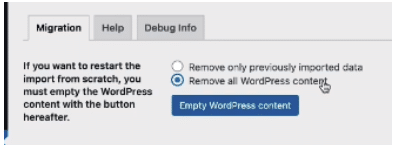
Before beginning the transfer process, you must configure a number of options on the importer page. Begin by specifying whether you want the importer to erase all current WordPress content. Because you are utilizing a new site, there should be no need to delete any content before beginning the migration. If you have any test pages or posts on your website, you can select the option to remove all WordPress content.
WordPress will prompt for your Drupal site’s URL. Choose how the plugin gets media files, with HTTP as default.
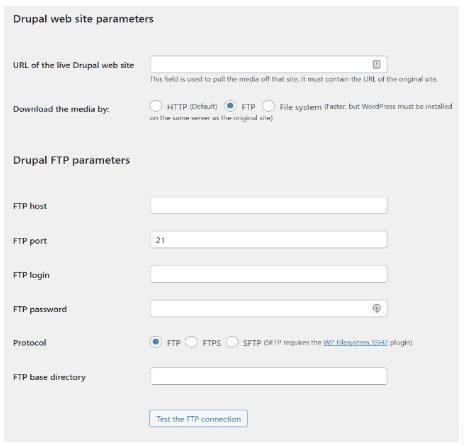
For a large site, consider FTP. Input FTP credentials from your hosting panel, ensuring they’re for Drupal, not WordPress. Click “Test the FTP connection” for confirmation or error diagnosis.
Enter Drupal database parameters.
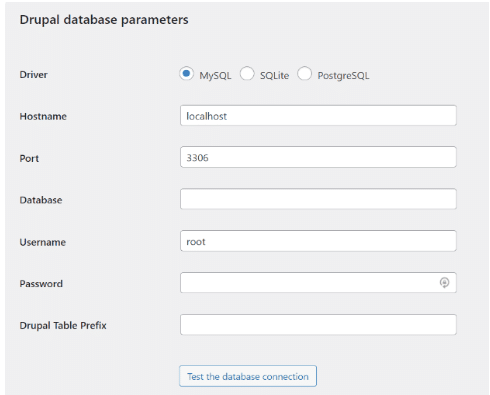
The plugin will then prompt you to input your Drupal database parameters. You’ll need to specify the type of database your Drupal site utilizes (MySQL, SQLite, or PostgreSQL), along with its hostname, port, name, and user details. If these details aren’t readily available, you can retrieve them from your Drupal site’s settings.php file. Access this file using FTP or your web host’s file manager.
Once inside, locate drupal/sites/default/settings.php and open the file with a text editor, taking care not to modify it. Your goal is to find and copy the information requested by FG Drupal to WordPress.
Fill in the database parameters and click “Test the database connection” to verify the settings. The plugin will display a success message upon confirming everything is in order.
Set the Post and Page Import Options.
You can decide whether the plugin adds posts and page summaries to their content in WordPress or imports them as excerpts. We suggest importing them as excerpts to avoid manual excerpt creation in WordPress.

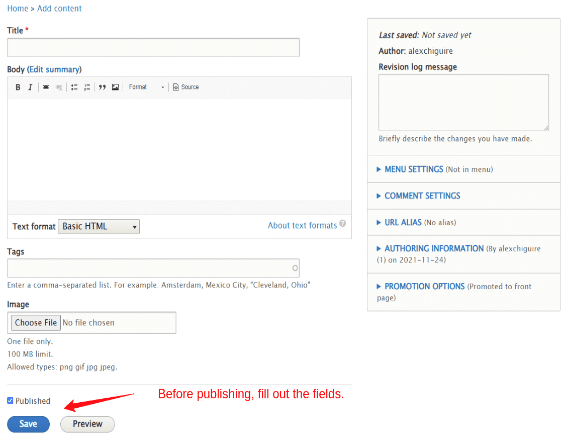
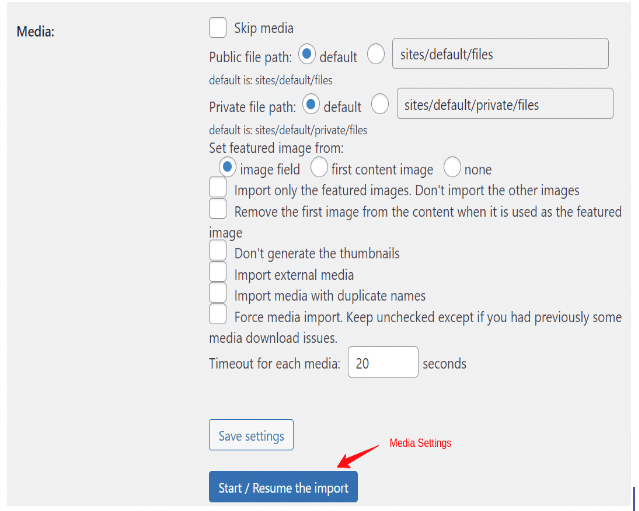
After that, specify where WordPress should store imported media files. It’s advised to stick with the default settings, which utilize the standard WordPress media folders. Additionally, you can select the preferred image for posts and pages in WordPress. Opting for the image field will automatically choose the Drupal Image file. This can be found below the Drupal editor and the Tags field.
You can prevent the plugin from creating thumbnails or placing the featured image in the content. It’s advised to keep these additional options turned off. Your media settings should appear this way.
Migrate Site From Drupal to WordPress.
Click ‘Start / Resume the Import’ follow the progress bar and log in below. Once done, you’ll see a success message. Don’t forget to click ‘Modify Internal Links’ in the ‘After the Migration’ section to update your links to match WordPress permalinks.
Test your pages and posts to make sure everything’s working smoothly. Remember, do this after setting permalinks to avoid any issues.
Directing Domain to WordPress.
Your content is now on WordPress, and your site is up and running. The last step is directing your domain to your new WordPress site. If you used a domain registrar, access your account, and update the DNS settings to point to WordPress.
Select a suitable theme for the WordPress website.
Your Drupal content is in WordPress now, but your site might look different due to the default WordPress theme. WordPress offers numerous themes for customization and a fresh look. Thousands of free and premium themes are available. Begin your search at the WordPress.org theme repository if you’re new to WordPress.
The migration process’s difficulty might vary based on the size and complexity of your Drupal website. If you are unfamiliar with the subtleties of WordPress migration, it is essential to plan properly, test exhaustively, and consider obtaining assistance from experienced WordPress developers.
Sreyas IT Solutions has many years of expertise in WordPress development and provides our service globally. Our developers are well experienced in custom software development and other services like data migration, database management, infrastructure management, web hosting, etc.


