Push Notification service provided in a Flutter IOS app by Sreyas needs multiple steps, including configuring your app in the Apple Developer portal, enabling Firebase Cloud Messaging (FCM), and integrating the required plugins into your Flutter project. Here is a full step-by-step guide on how we implemented our Push Notification service in IOS.
Step 1: Configure your app in the Apple Developer Portal
Create APP ID
- Go to Apple Developer Portal and navigate to Certificates, Identifiers & Profiles.
- Under the Identifiers section click the + button to create an App ID.
- Enter the description and bundle ID and also check push notifications under capabilities.
- After that step, you can tap the plus button xcode and search for 2 capabilities “Push Notifications” and “Background Modes”. Check “background fetch” and “remote notifications”.
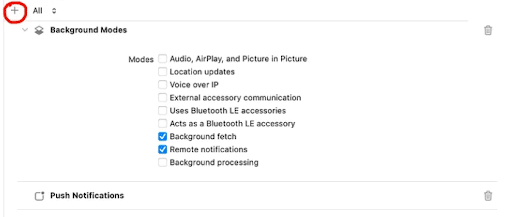
Create APNs Key
- Navigate to Keys and click the + button.
- Enter a key name, check Apple Push Notification service (APNs) in the checkbox, and continue.
- Download the key and save the .p8 file and note down the key id.
Step 2: Configure Firebase Cloud Messaging (FCM)
- Go to the Firebase console and create a new project.
- In the dashboard click Add app and select ios.
- Register the app with the same bundle ID.
- Download the GoogleService-Info.plist file and to your flutter project in the ios/Runner directory.
- In the Firebase console navigate to Project Settings > Cloud Messaging upload the APNs key and enter the Key ID and Team ID.
Step 3: Integrate FCM into your Flutter project
Add dependencies in your pubspec.yaml
Dependencies:
- flutter:
- sdk: flutter
- firebase_core: latest_version
- firebase_messaging: latest_version
AppDelegate.swift
import UIKit
import Flutter
import Firebase

@UIApplicationMain
@objc class AppDelegate: FlutterAppDelegate {
  override func application(
    _ application: UIApplication,
    didFinishLaunchingWithOptions launchOptions: [UIApplication.LaunchOptionsKey: Any]?
  ) -> Bool {
    FirebaseApp.configure()
    if #available(iOS 10.0, *) {
      UNUserNotificationCenter.current().delegate = self as? UNUserNotificationCenterDelegate
      let authOptions: UNAuthorizationOptions = [.alert, .badge, .sound]
      UNUserNotificationCenter.current().requestAuthorization(
        options: authOptions,
        completionHandler: {_, _ in })
    } else {
      let settings: UIUserNotificationSettings =
      UIUserNotificationSettings(types: [.alert, .badge, .sound], categories: nil)
      application.registerUserNotificationSettings(settings)
    }
    application.registerForRemoteNotifications()
    return super.application(application, didFinishLaunchingWithOptions: launchOptions)
  }
}
Create a file named push_notification_service.dart
import 'package:firebase_messaging/firebase_messaging.dart';

class PushNotificationService {
  final FirebaseMessaging _fcm = FirebaseMessaging.instance;

  Future<void> initialize() async {
    // Request permissions for iOS
    NotificationSettings settings = await _fcm.requestPermission(
      alert: true,
      badge: true,
      sound: true,
    );

    if (settings.authorizationStatus == AuthorizationStatus.authorized) {
      print('User granted permission');
    } else if (settings.authorizationStatus == AuthorizationStatus.provisional) {
      print('User granted provisional permission');
    } else {
      print('User declined or has not accepted permission');
    }

    // Handle foreground messages
    FirebaseMessaging.onMessage.listen((RemoteMessage message) {
      print('Got a message while in the foreground!');
      print('Message data: ${message.data}');
      if (message.notification != null) {
        print('Message also contained a notification: ${message.notification}');
      }
    });

    // Handle background messages
    FirebaseMessaging.onBackgroundMessage(_firebaseMessagingBackgroundHandler);
  }
}

Future<void> _firebaseMessagingBackgroundHandler(RemoteMessage message) async {
  await Firebase.initializeApp();
  print('Handling a background message: ${message.messageId}');
}
Main.dart
void main() async {

 WidgetsFlutterBinding.ensureInitialized();
 await Firebase.initializeApp(
     options: FirebaseOptions(
         apiKey: "",
         authDomain: "",
         projectId: "",
         storageBucket: "",
         messagingSenderId: "",
         appId: "",
         measurementId: ""
     )
 );
 runApp(MyApp());
}
Add code below to info.plist
<key>UIBackgroundModes</key>
<array>
  <string>fetch</string>
  <string>remote-notification</string>
</array>
<key>FirebaseAppDelegateProxyEnabled</key>
<false/>
Expertise and Support by Sreyas IT Solutions
We have successfully implemented our Push Notification service in many of our projects, such as BizBoot and AstroCall. Our expertise in this domain ensures seamless integration and functionality. We are committed to helping our global customers upgrade their apps to iOS, providing comprehensive support throughout the process.
If you need assistance with integrating push notification services in your Flutter iOS app or upgrading your application, Sreyas IT Solutions is here to help. Contact us to leverage our experience and take your app to the next level.

