At Sreyas IT Solutions, our Flutter team ensures seamless VoIP call. This guide explains how to create, convert, and store iOS certificates for VoIP call from Keychain to Firebase, making them ready for server-side usage.
Importance of Certificates for VoIP Call
Certificates from the App Store are crucial for securing app communications and confirming app identity. They allow for VoIP call, push notifications, and other sensitive features, ensuring data integrity and trust among the app, Apple’s servers, and end-users. Managing certificates properly is vital for smooth VoIP services and continuous functionality.
Now, let’s go to the steps for creating and saving the certificates.
- Requesting Certificates via Keychain Access
- Open Keychain Access on your macOS.
- Go to Certificate Assistant, then Request a Certificate From a Certificate Authority.
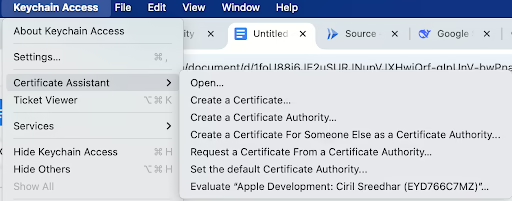
- Fill the email and download the file to your system.
- Creating Push Notification Certificates in Apple Developer Account
- Log in to your Apple Developer Account.
- Go to Identifiers and choose your App Identifier.
- Scroll down to Push Notifications and click Configure.
- Using the file you downloaded in Step 1, create two .cer certificates
- Download these certificates and add them in Keychain Access by double-clicking.
- Export the .p12 file from this and add it in Firebase Cloud Messaging
- Creating VoIP Services Certificates
- In the Apple Developer Account, create VoIP Services certificate(.cer).
- Download the certificate and add it to Keychain Access by double clicking on it.
- Export the certificate with its private key as a .p12 file.
- In Keychain Access, expand the certificate and click the down arrow, then select Export,give a name and create a .p12 file.
- Converting .p12 to .pem
- Convert the VoIP service Certificate exported as .p12 file into .pem file
- Use the following command to generate a .pem file:
openssl pkcs12 -in VoipCertificate.p12 -out Voip.pem -nodes -clcerts -legacy
- Extracting Key and Certificate for cURL
- To use the certificate in cloud functions, extract the key and certificate files from .pem.
Run these commands in terminal(inside the folder where these are saved):
openssl pkey -in talkOnVoipVoip.pem -out VOIPKey.pem
openssl x509 -in talkOnVoipVoip.pem -out VOIPCert.pem
- To use the certificate in cloud functions, extract the key and certificate files from .pem.
- Saving Certificates in Firebase
- Extract the string from each .pem file using cat:
cat VOIPCert.pem
cat VOIPKey.pem
- Extract the string from each .pem file using cat:
We will get strings in the following format:
—–BEGIN CERTIFICATE—–
MIIGljCCBX6gAwIBAgIQK32/xro42cdzkAkWCiVfvTANBgkqhkiG9w0BAQsFADB1
MUQwQgYDVQQDDDtBcHBsZSBXb3JsZHdpZGUgRGV2ZWxvcGVyIFJlbGF0aW9ucy
…
—–END CERTIFICATE—-
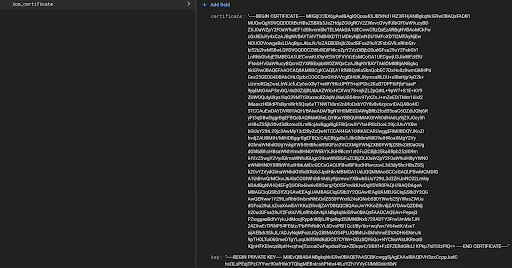
Save these strings securely in Firebase for server-side VoIP call handling.
Conclusion:
At Sreyas IT Solutions , We are dedicated to providing smooth and reliable VoIP call experiences on iOS and Android. By properly setting up and managing iOS certificates, from Keychain to Firebase, we make sure that communication stays secure and uninterrupted. Our method gives apps strong calling features that ensure reliable connectivity for every user.

